Fuel Calibration, Fuel Monitoring Method, Fuel Reports, Fuel Widgets
User Guide
This guide aims to provide you with step-by-step instructions on how to effectively navigate and understand fuel calibration and fuel consumption.

Fuel Widgets
Fuel widgets are graphical elements that display data based on readings from the vehicle's fuel monitoring sensor or device. There are 3 widgets that can be seen on the vehicle status panel. Fuel level, fuel consumption, avg fuel consumption
Fuel Level: This widget displays the overall current fuel level of the vehicle in liters and percentage.
Fuel consumption: This widget provides the overall fuel consumption of the vehicle for the current month. The 'MTD' (Month-to-Date) counter resets at the beginning of each month.
Average Fuel Consumption: Refers to the average amount of fuel consumed by a vehicle over a specific period of time or distance. It is typically measured in units such as liters per 100 kilometers (L/100km). This metric provides insight into the vehicle's fuel efficiency by indicating how much fuel is being used on average to travel a certain distance.
In the Fuel reports you will also see Titan calculate the L/100km.
There are three primary methods for fuel monitoring: OBD (On-Board Diagnostics), fuel tapping, and Bluetooth/wired level sensors.

-
OBD
Definition:
Using OBD devices, data is retrieved from the CANBus of the vehicle. The CANBus is the ‘brains’ of the vehicle which tracks a lot of the vehicle’s data.
Keep in mind that the capability to read fuel level and consumption varies depending on the vehicle. Some vehicles' CANbus can send to the tracker both fuel level and consumption, while others may only be able to read one of these parameters.
If you are testing with a customer vehicle please send a platform support request so that our platform engineers can help you in trying to read both the fuel level and fuel consumption parameters https://forms.manilagpstrackers.ph/75support_form
Installation:
For OBD installation, the process is straightforward and often considered 'plug and play.' Simply insert the OBD device into the vehicle's OBD port. It's important to note that the location of the OBD port may vary depending on the vehicle make and model. Refer to your vehicle's manual or manufacturer's guidelines to locate the OBD port specific to your vehicle.

-
Fuel Tapping
Definition:
Fuel tapping is when we connect the GPS tracker directly to the fuel sensor of the vehicle. Fuel tapping functions by relaying voltage readings from the vehicle's gauge to the device tracker. Each voltage reading corresponds to a certain fuel level.
However, its accuracy can be compromised by sensitivity to road conditions, leading to potential fluctuations in readings.
Installation:
For fuel tapping installation, please coordinate with our qualified technician or support.

-
Bluetooth/Wired Fuel Sensor
Definition:
The Bluetooth fuel sensor measures fuel levels within the tank by detecting changes in height. Unlike fuel tapping, it utilizes a digital connection, which reduces susceptibility to fluctuations often associated with analog sensors. This digital connection ensures more stable and accurate readings, enhancing reliable monitoring of fuel levels remotely.
Installation:
The fuel level sensor needs to be installed inside the vehicle's fuel tank, requiring a small 35mm hole to be made. For further details, please coordinate with our qualified technician or support.
Accuracy
Of the 3 methods for fuel monitoring (OBD, fuel tapping, Bluetooth), the most accurate methods are the OBD and Bluetooth.
Calibration
Regardless of which fuel monitoring method you use, you need to perform calibration on the platform so that the platform knows what sensor values (sensor values are the values coming from OBD device, or fuel tapping voltage, or bluetooth digital values) equal to what fuel level.
To access the fuel calibration page first select the vehicle that you will be calibrating.

Then click the gear icon and choose ‘Fuel calibration’.


You can now enter the sensor values on the left and the corresponding fuel level on the right.
To get the sensor values you just need to view the raw device data in the ‘Air Connect’ feature. Go to the ‘Devices’ page in the backend panel, and click the ‘Air Connect’ icon.

Click the ‘i’ icon.

You will now see all the data of the device.

You will then need to find the right parameter for fuel level and/or fuel consumption.
Fuel Level
For OBD devices the parameter is usually “fuel.consumed”.
For fuel tapping the parameter is either “ain.1” or “ain.2”
For bluetooth fuel sensor the parameter is usually “escort.lls.value.1”you don’t need a technician, simply submit a platform support request
Fuel Consumption
Bluetooth fuel sensors and fuel tapping do not provide fuel consumption parameters because these 2 methods are simply reading fuel levels, not fuel consumption. However, we are still able to estimate the fuel consumption using the change in fuel levels, which is why you can see a fuel consumption widget and fuel consumption reports for devices with Bluetooth or fuel tapping.
Fuel Calibration
Below you can see the ‘Calibration table’ where you will enter the sensor value and the corresponding fuel value.

The proper calibration is essential for accurate fuel readings, widget readings, and fuel reports.
For OBD devices the only two values you need to input in the fuel calibration table is when the tank is empty and when the tank is full.
For fuel tapping and bluetooth fuel sensors you can coordinate directly with a technician and he will empty the fuel tank, you will then take a reading of the fuel level parameter, then technician will add a bit of fuel, you will take another reading, and this will continue until the tank is full.
Important: Please remind technician not to connect his voltmeter or other similar instruments to the fuel sensor or tracker when you are reading the fuel tapping or bluetooth sensor values because his voltmeter can interfere with the readings. The only reading that matters is the reading that you see in the Air Connect.

Calibration Table
By using a calibration table, the system can detect whether the fuel tank is empty or full, enabling the device to send accurate data. Calibrating this parameter is important because fuel tank sizes vary between vehicles, therefore ensuring that the readings are always suitable for fuel tank dimensions.
Please refer to the below table for example of a calibration table:

Entering data in the table starts with the technician gradually filling up the tank. They begin with 0 liters and adds 5 liters (or less) during each fill. The smaller each fill is the more accurate the fuel readings will be. The technician records the sensor value where it acquires the reading value from the mobile application after each increment. This process continues until the tank reaches its maximum capacity, which in this example, is 100 liters.

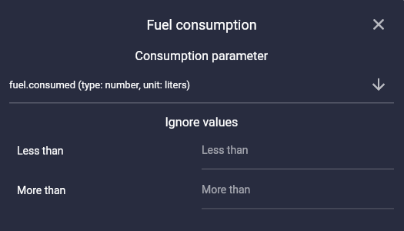
Fuel Consumption Parameter
As previously mentioned, only OBD devices may or may not have a fuel consumption parameter. You input this parameters in the ‘Consumption parameter’ field in above screenshot.

Thresholds in fuel level sensor
Refers to a predefined value that determines when an alert is triggered based on the fuel level readings. Specifically, it represents the minimum or maximum fuel level at which the sensor will initiate an alert, such as notifying the user of critical fuel levels or potential issues.
Users can also check the box to ignore drains/fills while the vehicle is moving. This prevents the device from including these readings, which can be inaccurate due to fuel sloshing in the tank during motion. The sensor works best when the vehicle is stationary, ensuring more accurate fuel level measurements.
The recommended threshold value is initially set at 8 liters. However, clients have the flexibility to adjust this threshold to align with their specific preferences and requirements.
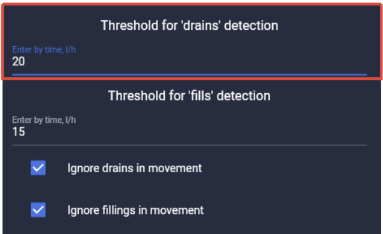
Threshold for ‘drains’ detection
In configuring this parameter, it's essential to establish a drain threshold as the sensor's trigger point for sending alerts. Once the sensor detects the fuel level decreasing to and surpassing 8 liters, it will trigger an alert, indicating the reading as a drain event.

Threshold for ‘fills’ detection
Similarly to the drain threshold, it's essential to establish a fills threshold as the sensor's trigger point for sending alerts. Once the sensor detects the fuel level increasing to and surpassing 8 liters, it will trigger an alert, considering the reading as indicative of a fills event.

Ignore values
This parameter allows you to specify a threshold value. When set, the sensor will disregard any readings that fall below or exceed this value (e.g 1). This feature is designed to prevent inaccurate readings and maintain the reliability of the sensor's data.

Multiplier
This parameter simply multiplies the sensor reading by the value entered by the user. It’s only necessary if precise adjustments to the sensor output are required for specific applications or scenarios. For instance, when the sensor's default output needs to be calibrated to match a particular measurement scale or when fine-tuning is necessary to accommodate variations in the sensor's performance. However, for fuel calibration, it is not necessary to enter a value for multiplier, so the user can leave it blank.


Fuel refills and drains report
In this report, users can adjust parameters and select a specific vehicle to retrieve data from. This report functions as an alert system for monitoring fuel refills and drains within the vehicle. It helps to detect any unauthorized or suspicious activity, such as fuel theft in the vehicle's fuel tank.

Here, the user can initially search the vehicle name or check the box to get the data report from.
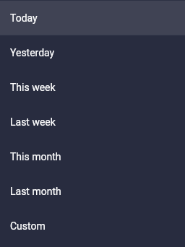

Select Period
The user has the option to select a specific period for data collection. For instance, if you select last week, you will receive the data for that duration.

Select Grouping
This is to sort how the user wants to organize or group the devices in the report.

If the user hasn’t calibrated the table or needs to input a new value, you can do so using this setting. Simply enter the minimum fill/drain value manually, and the system will notify you when the fuel level reaches that threshold. Otherwise, check the box to indicate that the table has been calibrated, so there's no need to specify a value.


Select Graph Type
For this final parameter, the user can choose between "Mileage" or "Time." If "Mileage" is selected, the graph will be based on date, while the mileage will be based on the distance traveled (km) by the vehicle.

Time for graph type

Mileage for graph type
END OF DOCUMENT